Mail is a real inbox inside Kaer. Kaer sorts what arrives, summarises it and drafts replies in your tone. You read the drafts, change what you want, and approve before anything goes out.
Before you begin
- A Kaer address needs a plan that includes a mailbox. Core, Pro and Max include a Kaer inbox. If yours does not, Kaer asks you to pick and pay for a plan before the address is created. See Billing and credits.
- Your existing mailbox needs its IMAP server details and, for most providers, an app password from that provider.
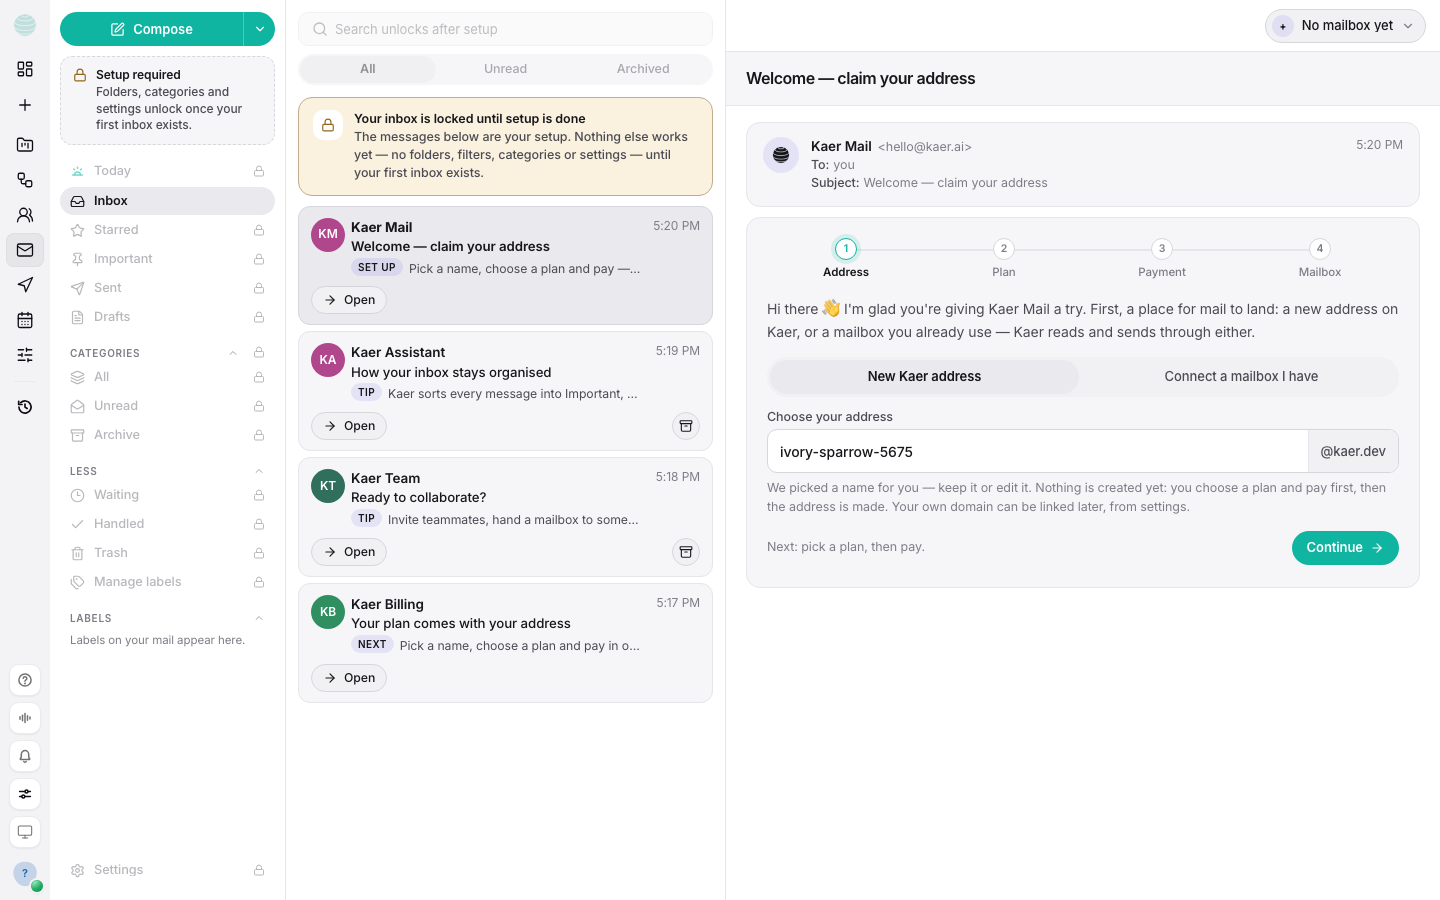
Until a mailbox is set up, Mail is empty on purpose.
Get a Kaer mailbox
Open Mail
Choose Mail in the rail, or Get a mailbox on the Dashboard.
Choose your address
Choose New Kaer address, then type the name you want. Use letters, numbers, dots, dashes, plus signs or underscores.
Create it
Choose Continue. Setup moves through four stages: address, plan, payment and mailbox. If your plan needs payment first, choose Continue to payment and finish checkout. No mailbox is created until it is paid for.
Wait for it to go live
Kaer reserves the address and confirms delivery before it goes live. This usually takes about a minute.
Connect a mailbox you already have
Your mail stays where it is. Kaer reads and drafts on top of it.
Choose to connect your own
In Mail setup, choose Connect a mailbox I have.
Enter the connection details
Fill in your address, IMAP server, IMAP port and App password. Your mail provider's help pages list these.
Test and connect
Choose Test connection to check the details, then Connect mailbox.
Let it sync
The first sync imports your latest mail. It starts within a few minutes.
To send from your own domain, add it afterwards in Settings → Mail → Domains. If the domain is on Cloudflare, Kaer can write the DNS records for you.
Find what needs you
The rail under Mail splits your inbox by what it needs:
| View | Shows |
|---|---|
| Today | A summary of the day's mail |
| Inbox | Everything |
| Action required | Mail that needs you or an answer |
| Waiting | Threads waiting on someone else |
| Handled for you | Mail Kaer has filed or dealt with |
To sort the inbox on demand, choose Triage my inbox now.
Draft a reply and approve it before it sends
Open the message
Choose the thread in your inbox.
Draft the reply
Choose Draft with Kaer. The draft is written in your voice.
Edit it
Change anything you want. The edits you make on your first few drafts help tune the ones after.
Approve and send
Choose Approve & send when it is right, or Discard draft if not.
Choose how much Kaer does
In Settings → Mail → Triage & AI, pick how triage runs:
| Mode | What happens |
|---|---|
| Manual | Nothing runs until you trigger it |
| Semi-auto | Kaer classifies mail, then asks |
| Full auto | Kaer acts when it is highly confident |
Keep routine answers automatic and the rest gated.
File mail with rules and macros
In Settings → Mail:
- Rules file mail for you. Pick a condition, such as Sender contains, Subject contains or Body contains, and an action, such as filing under Action required or Handled for you. Choose Add rule to save it.
- Macros insert text you write often. Choose Add macro, name it, and write the text.
Common questions
Can Kaer send without me?
Not to other people. Email to anyone but you waits as a draft until you approve it. A workflow you built and reviewed can send, and approval steps in it still wait for you.
Does connecting my mailbox move my mail?
No. Connected mailboxes stay with your provider. Kaer reads and drafts on top of them.
Can my AI assistants use Mail?
Yes. You can give an assistant access to a mailbox in Settings → Mail. See AI assistants.
Troubleshooting
"Couldn't connect that mailbox"
- Check the IMAP server and port against your provider's help pages.
- Use an app password, not your normal password. Most providers require one for IMAP.
- Choose Test connection again.
"Mail needs a payable plan to send and receive"
Your plan does not include a mailbox. Upgrade in Settings → Billing. See Billing and credits.
"That address was taken while we set it up"
Someone else took the name first. Start over with a different name.